A modular cat room divider is most convincing when it solves a human-room problem first: it creates a visual boundary between living, working or sleeping areas while still behaving like a considered piece of furniture. Cat access is then designed into the divider through rest modules, platforms and pass-throughs—not added as a few decorative holes after the cabinet has been drawn.
For a brand, importer, retailer or hospitality buyer, this creates a useful development brief. The product needs a clear room-facing side, a cat-facing route, a stable base, practical surfaces, a credible material specification and an assembly plan. It must also avoid overpromising. A room divider cannot determine an individual cat’s needs, household dynamics or safe use; those remain matters for the caregiver and, where needed, a veterinary professional. The purpose of this guide is to turn the product concept into reviewable decisions before sampling.
Start with two plans: the room plan and the cat plan
Begin by defining what the divider separates. It might soften the transition from a sofa area to a desk, screen a bed from a living space or create a quiet visual edge in a studio apartment. Record the available floor footprint, ceiling clearance, desired sightlines, walking routes, skirting boards, nearby doors and windows, and the furniture that will sit on either side. A divider that blocks a door swing, creates an awkward narrow passage or cannot be positioned as photographed will be difficult to sell regardless of its pet features.
Then create a separate cat-use plan. Mark the intended approach side, low entry points, resting modules, broad platforms and optional elevated routes. This is more useful than simply counting cubbies. The Feline Veterinary Medical Association notes that cats need safe places and that key resources should be separated; it also notes that a threatened cat may need to enter and leave a safe place from more than one side. That is a welfare consideration for the household, not a universal furniture specification. In a product brief, it means the buyer should deliberately decide whether an enclosed module is an open-backed pass-through, a single-front resting cubby, or not positioned as a “safe place” at all.
1. Make the divider look intentional from both sides
A room divider is seen in the round. Give the front, back and end elevations equal attention: exposed backing, unfinished panel edges, screw heads and loose cable paths will undermine the furniture value. Decide which faces are display shelving, which are closed boxes, which are open passageways and which must remain visually calm from a seated eye level.
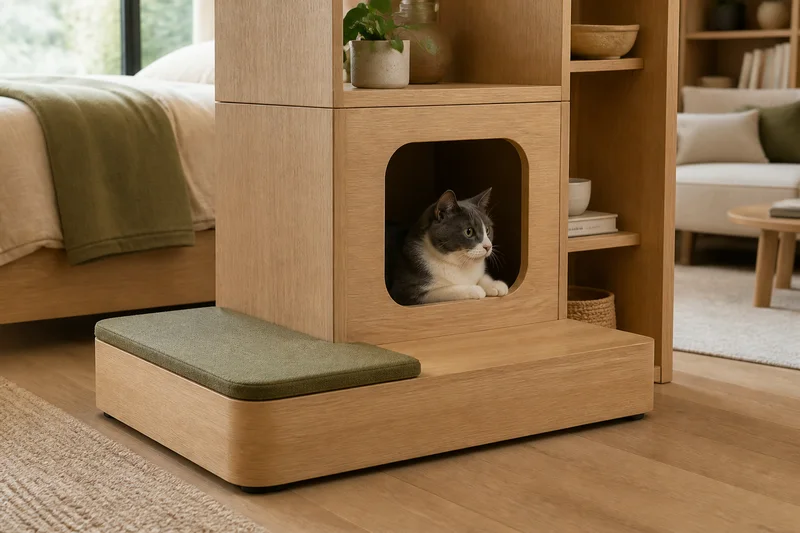
A modular layout can use a low storage plinth with vertical cube modules above it. The base establishes the horizontal furniture line; the upper sections create the room division. Avoid treating every void as a cat opening. Open cubes may hold books or objects, while purpose-built pet modules can have controlled entry geometry, removable pads or wipeable interiors. This makes product photography and product communication clearer: buyers can see the human storage role and the pet role without guessing.
2. Define the cat route, not just the number of platforms
On the drawing, show every intended transition from floor to base, base to platform, platform to cubby and platform to shelf. Give each platform a defined usable surface, edge treatment and intended direction of travel. A platform interrupted by a decorative object, a too-small opening or an unclear landing surface is not a useful route merely because it appears on a render.
Keep the language disciplined. Do not claim that a divider “reduces stress,” “fits all cats” or provides a complete enrichment environment. Cats differ in age, mobility, confidence and social relationships. Instead, state the confirmed product facts: number of platforms, pad type, module openings, reachable parts and cleaning method. Where a brand sells to multi-cat households, it should ask customers to consider individual animals and the rest of the home environment rather than implying that one furniture unit solves access to food, water, toileting, scratching and resting resources.
3. Treat enclosed modules as serviceable furniture components
An enclosed cat box needs more than a rounded cutout. The technical drawing should state its clear internal width, depth and height; panel thickness; entrance size and radius; interior finish; pad or cushion dimensions; ventilation or open-back concept, if any; and how the user reaches the interior for cleaning. Exterior cube size is not usable interior space. Veneer, edge banding, liners, pads and joining panels all change the available volume.
For a removable textile pad, specify fabric composition, finished size, attachment method, backing, edge binding and care language only after the selected material is approved. If a module has an open back or a second opening, show how it relates to the intended room placement. A back opening that faces a wall at the recommended installation location is different from a two-sided pass-through. The functional sample should be reviewed in the planned orientation—not only photographed against a blank studio wall.
4. Choose a module and connector system before costing
“Modular” should identify what changes, what repeats and how parts join. A good development pack names the repeatable cube width or height, the base sections, the shelves, the enclosed modules, the left/right or front/back orientation, the connector locations and the finished faces. It also identifies any non-repeating part, such as a top bridge, a corner infill or a weighted base component.
Connector selection is a product decision, not a generic hardware line. Confirm whether modules use concealed furniture connectors, bolts into metal inserts, dowels for alignment, back-panel joining plates or another approved construction route. The sample review should check registration between visible faces, access to tools, tolerance around finished surfaces, hardware-pack separation and whether the customer can tell similar modules apart. A concept may be elegant but still fail at assembly if two near-identical panels can be reversed.
5. Be precise about freestanding use, floor contact and installation boundaries
Freestanding does not mean every configuration is suitable in every home. The base footprint, upper-module arrangement, floor-contact pads, connector design and intended placement must be evaluated together for the actual product. A taller or asymmetrical configuration may need different engineering, an installation instruction or a different commercial positioning from a lower divider. Do not make a general anti-tip, load or wall-fixing claim from a lifestyle image.
Ask the buyer to provide the intended maximum arrangement, room location, target market and installation expectations. The supplier can then develop the confirmed configuration, instructions and any required fixing or warning information. For the functional sample, review the furniture with pads installed, doors or drawers opened if present, display objects in their intended positions and the flooring relevant to the customer. Final construction and safety expectations must be approved for the actual model, not borrowed from a different cabinet.
6. Specify materials by component—and keep claims traceable
List the substrate, visible finish, edge treatment, back panels, solid-wood details, coating, textile pads, pad filling, metal connectors, feet and any plastic glides separately. This lets a buyer compare veneer, laminate, plywood or engineered-wood routes without losing track of the visible furniture effect. It also makes a factory quotation more comparable because the supplier can distinguish structural panels from cosmetic faces and replaceable soft goods.
For products supplied to the United States, the U.S. Environmental Protection Agency identifies hardwood plywood, MDF and particleboard as regulated composite wood products under TSCA Title VI, and its FAQ addresses finished goods containing those panels. The applicable documentation, certification and labeling must be confirmed for the actual product, material route and destination market. “Low emission,” “eco” or similar marketing language should not be used as a substitute for traceable panel and finished-goods documentation.
7. Design flat-pack in the same meeting as the furniture
A divider may need to ship as a base carton plus one or more module cartons, or as a coordinated multi-carton set. Neither route is automatically better. The decision depends on panel size, finished-face protection, weight distribution, customer assembly time and the intended retail channel. Build the carton plan alongside the module plan: which panel needs a face protector, which edge needs a guard, where connectors and tools sit, and how the instruction sequence matches the unpacking order.
Give each module a concise part code and show that code in the drawing, carton list, hardware bag and assembly manual. Separate metal parts from visible timber faces. Keep removable pads dry and protected from dust or migration from black hardware. Test the packing order with a person who did not design the product. Their questions about left/right panels, bridge orientation or connector access are evidence that the kit needs revision.
When a parcel-distributed package requires performance validation, ISTA describes its 3-Series procedures as general simulations of transport motions, forces, conditions and sequences. The appropriate procedure, sample quantity and acceptance criteria depend on the confirmed package and actual distribution route. A pass result belongs to the tested packaging configuration; it should not be generalized to every carton size or delivery condition.
Use three approval gates
| Gate | Decision | What to review |
|---|---|---|
| Concept and quotation | Is the room-divider direction commercially clear? | Room role, footprint, intended configuration, cat-route concept, storage/display function, material direction and target price. |
| Functional sample | Do the modules work as a furniture system? | Usable cubby dimensions, platform surfaces, accessible cleaning, module registration, connectors, floor contact, finish and assembly sequence. |
| Packed pre-production sample | Is the sellable specification complete? | Approved bill of materials, labels, instructions, hardware bags, carton protection, parts list, inspection points and confirmed package test plan. |
What to include in a quotation request
- Room plan or reference images, plus maximum width, depth and height.
- Primary role: visual divider, display/storage furniture, cat-access furniture—or a defined combination.
- Target configuration, number of repeatable modules, open-cube and enclosed-cubby mix, and intended cat-route concept.
- Clear internal requirements for any rest module, plus pad material and cleaning direction.
- Visible material, panel substrate, finish, edge treatment, connectors, floor-contact method and destination market.
- Expected carton count, retail channel, assembly-time objective, label requirements, estimated quantity and target price.
- Any retailer testing, inspection, installation, warning or package-performance requirement.
Frequently asked questions
Can a modular divider be offered in several layouts?
Yes, if each sellable layout has its own approved drawing, bill of materials, connector pattern, assembly instructions and packaging plan. Do not assume that a configuration is approved merely because the same cubes appear in another arrangement.
Should every cube be usable by a cat?
No. A considered divider can mix enclosed pet modules, broad platforms, display cubes and closed storage. The goal is a clear furniture composition and a deliberate cat-use route, not the maximum possible number of openings.
Can the divider ship flat-packed?
Yes, provided that the module sequence, connectors, labels, visible-face protection, hardware bags and carton allocation are developed and checked together.
Where can I view related product directions?
Explore our cat-integrated furniture range, including the modular cat room divider, cat climbing bookcase and dresser with cat climbing module. For a custom program, see our development process or send a product brief.
Sources: Feline Veterinary Medical Association environmental-needs guide; U.S. Environmental Protection Agency TSCA Title VI composite wood product FAQ; and International Safe Transit Association test-procedure overview. This article is a product-development guide, not pet-behavior, safety, certification or legal advice. Final dimensions, materials, structural design, installation, assembly, packaging and market requirements must be confirmed for the actual product before production.