A litter-box bench combines three routines: a person sits to change shoes, footwear needs storage, and a cat needs an accessible toilet. A successful product must keep those routines from interfering with each other. For importers and furniture retailers, the most useful question is not how much can be hidden behind a cabinet door, but whether the finished layout works when somebody actually uses and cleans it.
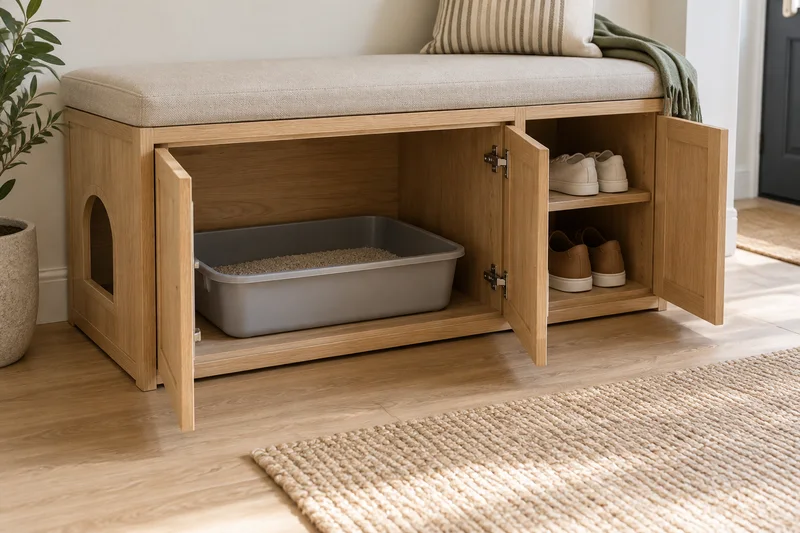
This guide focuses on the two-zone litter-box entry bench concept: a dedicated litter compartment beside a separate storage compartment. The images are AI-generated development illustrations, not photographs of manufactured samples. Dimensions, materials, seating performance and final construction require drawing and sample approval.
Start with a placement decision, not a cabinet size
An entryway is not automatically a suitable place for a litter tray. Cats Protection recommends quiet locations away from disturbances such as doorways and corridors, and away from food, water and sleeping areas. A busy entrance with people, dogs and slamming doors may be a poor choice even if the furniture fits neatly.
Position this product as a possible solution for a quiet alcove or low-traffic area, not a universal hallway upgrade. Before developing the range, decide which room situations the retail photography and instructions will show. If the intended site cannot offer reliable access and a quiet toileting area, choose a different location or a non-litter bench design. Furniture styling should not override the cat’s needs.
Draw the entrance door, walking route, coat overhang and the cabinet’s service-door swing. A side-entry opening needs space beside it after installation; placing that panel against a wall defeats the design. Check the plan with shoes on the floor, not just an empty showroom arrangement.
Define what the two zones actually do
In this brief, one compartment houses a conventional removable litter tray and the other stores footwear or accessories. A full divider makes the functions easier to organize and reduces direct transfer of loose litter into the shoe area. It does not make either space airtight, sterile or odor-proof. Avoid marketing those results without relevant evidence.
Keep the cat’s access route independent of the shoe-storage opening. An owner should not need to move boots or open a cupboard every time the cat enters. Storage accessories should remain in their own compartment. Cleaning chemicals should be kept securely elsewhere, rather than loose beside the tray or where a pet or child can reach them.
Choose the tray before fixing the panel layout
Ask for the actual tray model or a dimensioned drawing, including its widest rim, handles and highest edge. The nominal base footprint is not enough. Set it inside a full-scale mock-up and check entry, turning room and the height remaining above it. A cabinet that accommodates the tray as an object can still leave inadequate space for the cat using it.
For a simple dimensional example, a compartment with a clear width of 620 mm and a tray with a 560 mm outside rim leaves 60 mm in total, or 30 mm on each side if centered. That arithmetic says nothing about sufficient animal movement or hand access. Hinges, stops, liners and the entry passage may consume the apparent margin. These are illustrative figures, not a product specification or a fit recommendation.
Publish the clear internal width, depth and height separately from external cabinet dimensions. Also show the opening dimensions and threshold height. Cats Protection notes that tray choice varies by cat and that older cats or those with mobility difficulties may need low-sided trays. The cabinet entrance must not undo that accessibility by adding a high front rail.
| Item to record | Why it matters |
|---|---|
| Tray rim width, length and total height | Confirms the real object that must fit and pass through the service opening. |
| Clear compartment dimensions | Accounts for panels, fittings and the liner rather than relying on outside size. |
| Cat opening and threshold | Defines the entry route with the selected tray in place. |
| Open-door and extraction envelope | Shows whether servicing works in the intended room. |
| Separate storage dimensions | Keeps footwear capacity from quietly reducing the litter compartment. |
Give the owner a different, larger service opening
The cat entrance should not be the only way to reach the tray. Wide front service doors can let the owner scoop, wipe interior surfaces and remove the tray. Confirm that door hinges, a fixed central post and the seat-support rail do not reduce the effective opening below the tray’s widest dimension.
During sample review, remove the tray with representative contents and a realistic handling method. Check whether it must be tipped, whether the rim catches the door and whether the owner can grip it securely. A sliding base may help some arrangements, but it adds hardware, dirt traps and an extended-load condition that need evaluation. A straightforward removable tray can be a better starting point than an untested mechanism.
Specify cleanable surfaces all the way into the corners
A polished exterior does not protect an unfinished interior edge. Identify the base, divider, back panel, cut-out edges, screw holes and panel joints that might encounter moisture or cleaning. State the substrate, finish and edge treatment for each. “Oak appearance” describes a look; it does not identify whether the component is solid timber, veneer or decorative laminate.
A removable liner can simplify cleaning, but it needs to lift out without dismantling the bench. Check whether its raised edges interfere with the tray or create an extra entry step. Review where liquid could pass underneath it and how the owner would reach that area. Do not equate a moisture-resistant panel or liner with a waterproof assembled cabinet.
Agree a care method for the selected finish and supply matching instructions. Avoid blanket claims that any household cleaner is suitable. Ask for wipe-clean trials on the actual finish and inspect seams and cut edges afterwards. Record the method, cleaning product and observations so the result can be repeated rather than described only as “easy care.”
Plan ventilation without promising odor elimination
Openings should remain unobstructed when the cabinet is installed. Rear ventilation may become ineffective if pressed tightly against a wall; side openings may be blocked by shoes, coats or adjacent furniture. Show their intended clearance in the installation drawing and verify it on the sample.
Ventilation is not a substitute for cleaning or for a suitable litter arrangement. Avoid “odor-free” claims based solely on slatted panels. If a replaceable filter is proposed, define its mounting, access and replacement supply; do not assume a decorative grille proves measurable performance. A powered fan changes the product’s electrical, noise, maintenance and compliance scope and needs its own development review.
A seating bench needs more than a cabinet-top claim
Specify whether the product is genuinely intended for adult seating or only as a storage cabinet. A wide service opening and a large side entrance remove material from areas that may contribute to stiffness. The top must transfer the intended load through suitable rails, dividers, side panels and base components, without depending on closed doors for support.
Ask the supplier and test laboratory to agree the relevant strength, durability and stability assessment for the target use and market. Do not copy a kilogram rating from a visually similar bench. Test the finished construction and retain the report tied to its revision. If wall restraint is needed, define appropriate installation instructions for the intended wall situation rather than treating an unspecified screw pack as universal.
A fixed seating top with front-access cleaning can avoid lifting the seat during every service visit. If a lift-up top is proposed, review pinch points, lid support and accidental closure separately. Cushion attachment, cover removal and care labeling also belong in the approved specification.
Review assembly and packaging as part of the product
Flat-pack versions need unmistakable panel orientation: reversing the side with the cat opening can make the delivered layout unusable. Left-entry and right-entry versions should be distinct order options unless the construction is genuinely reversible. Instructions should explain the sequence without asking the customer to drill new holes or improvise fittings.
Protect the large side cut-out and long seating panel inside the carton. Secure hardware away from finished surfaces and separate the cushion from components that could stain or puncture it. Obtain packed dimensions, gross weight, carton count and a packing layout for the exact version being quoted. Select distribution testing with the laboratory using the relevant ISTA procedure; the appropriate choice depends on the shipment configuration and distribution environment.
Use a functional-sample checklist before placing the order
- Confirm that the proposed room location is quiet and that the cat entrance stays accessible.
- Measure the actual tray, interior, entrance and clear service-door opening.
- Check the layout with footwear stored and all doors in normal use.
- Remove the tray and liner, reach the rear corners and reinstall everything without dismantling the bench.
- Inspect edges, hinges, connectors, ventilation openings and the seat-support structure.
- Have an unfamiliar assembler follow the instructions and record mistakes or unclear steps.
- Resolve sample discrepancies and link the drawing, material list, test plan, instructions and packing specification to one approved revision.
What to include in your quotation request
Send the room sketch, maximum external footprint, actual tray dimensions, preferred entry side, required storage capacity and intended seating use. Add your finish reference, destination market, order quantity, assembly preference and delivery channel. Ask quotations to identify included accessories, sample charges, tooling, packaging and replacement parts separately. This makes proposals comparable without inventing a universal price or lead time.
Explore our litter-box furniture range or the ventilated sideboard concept if a seating format compromises interior space. We support customized layouts, dimensions, finishes and component choices through our design and development process. Share your brief for a project-specific sample and quotation discussion.
Frequently asked questions
Can this replace every other tray in the home?
No. A furniture enclosure does not change the household’s need for appropriate litter resources. Cats Protection recommends one tray per cat plus an extra, with suitable separate locations. Plan the furniture as one possible location, not a substitute for that wider arrangement.
Does it fit an automatic litter box?
Not by default. This guide concerns a conventional removable tray. Automatic units require model-specific checks for overall size, moving parts, servicing, sensors, ventilation and power routing, following the appliance manufacturer’s instructions.
Is the illustrated bench ready to order exactly as shown?
The illustration communicates a development direction. Final dimensions, accessories, performance claims, price and production timing depend on the approved specification and sample.