A full-height mudroom locker can organize coats, leads and shoes while providing a seat for the owner. Adding a small-dog resting nook introduces another requirement: the lower compartment must remain a usable, comfortable place rather than leftover space beneath the bench. For brands and importers, the product is a combination of seating furniture, tall storage and a pet resting place, each with its own dimensions and validation needs.
This guide develops the mudroom locker bench with pet nook concept into a practical quotation and sample brief. Images are AI-generated development illustrations, not photographs of manufactured samples. Final dimensions, materials, wall fixing, seating performance and packaging depend on an approved drawing and physical sample.
Decide whether the location suits the dog
A mudroom can be quiet between walks, but a busy front door, wet coats, children and passing shoes can disturb a resting animal. Dogs Trust recommends a quiet space with limited foot traffic, while recognizing that individual dogs may prefer to be near the family. A locker nook should be offered as an optional resting place in a suitable room, not as the only bed a dog needs.
Sketch the door swing, walking route, boot removal area, floor mat and location of the cabinet. Do not place the opening where a door, coat hem or pile of shoes blocks access. If traffic or drafts make the nook unsuitable, the family needs another quiet resting place. The retail description should allow for this choice rather than promising that every dog will use the furniture.
Define four separate jobs
Before fixing the overall dimensions, write down the intended use: number of coats and hooks, footwear storage, one seated adult or another defined seating scenario, and the intended dog profile. These choices compete for space. A larger boot compartment can reduce the clear nook width; an upper cupboard can raise the overall height and change installation and packing.
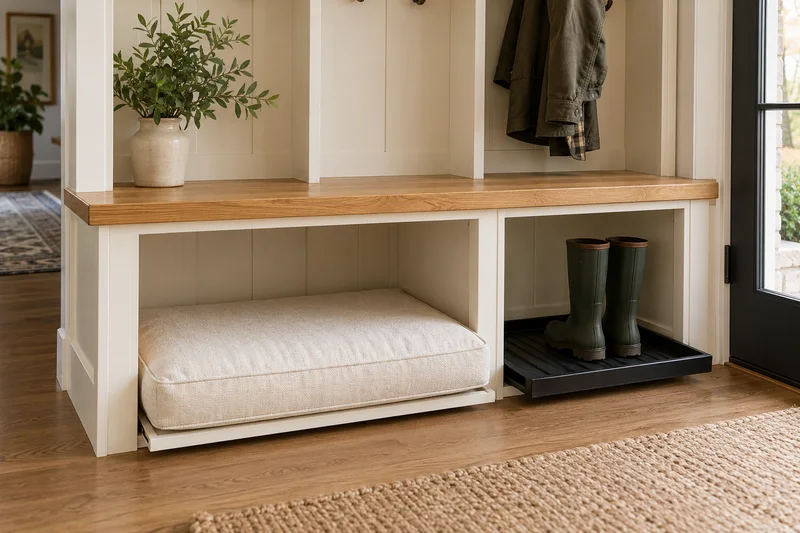
On the drawing, identify the coat zone, seat, dry pet bay and removable boot tray. A full divider between the tray and bedding helps organize daily use and reduces direct transfer of dirt, but it is not a waterproof or hygienic seal. Keep cleaning chemicals and small loose accessories out of the pet compartment.
Measure usable space, not just the cabinet exterior
The concept listing shows a reference exterior of 1,200 × 450 × 1,900 mm. It is a development reference, not an approved product size or a dog-fit claim. Record the clear nook width, depth and height after the divider, base, back, seat supports and cushion are in place. The dog should be able to enter, turn and settle comfortably for its individual size; ask for a suitable alternative when it cannot.
For example, a 1,200 mm exterior width with two 18 mm side panels and one 18 mm divider leaves 1,146 mm before other construction details. If a buyer assigns 280 mm of that clear width to footwear, 866 mm remains for the pet side. This is arithmetic for discussion, not a recommended specification. The actual drawing must include tolerances, fittings and required clearance for the chosen cushion.
| Measurement | Buyer review |
|---|---|
| Overall width, depth and height | Fit through the room and door, including skirting and wall clearance. |
| Clear nook dimensions with cushion | Actual resting space after panels and seat supports are deducted. |
| Entry opening and threshold | Access for the intended animal and the selected cushion. |
| Seat height and usable depth | Human seating position and obstruction from coats. |
| Tray width, height and removal path | Boot capacity and the space needed to clean underneath. |
| Wall fixing points and clearance | Installation against the actual wall and skirting arrangement. |
Give the cushion and boot tray independent removal paths
A boot tray may have a raised lip to contain ordinary drips, but its useful capacity, material and cleaning method must be specified. Show how it slides out when the cabinet is installed, whether footwear must be removed first and whether the owner can reach the cabinet base beneath it. A tray is not evidence that the cabinet as a whole is waterproof.
The cushion should come out through the pet opening without dismantling the locker. Record its finished outline, cover, filling, underside and closure. A removable cover is useful only when the actual textile and care instructions support the claim. Confirm whether a replacement cushion and a replacement tray can be ordered separately.
Engineer the bench and tall upper section as one structure
The seat carries loads through its top, rails, dividers, side panels and base. Large lower openings can reduce support if the design relies on decorative panels. Define the intended seated use and develop the seat construction with the supplier and test laboratory; do not transfer a weight rating from a visually similar bench.
The tall back and upper storage introduce another stability issue. The U.S. Consumer Product Safety Commission advises anchoring tall furniture such as bookcases and dressers to the wall. Identify the locker’s fixing points on a structural member, show how to access them after assembly and specify the wall clearance needed for skirting.
Wall materials differ. The supplied kit and instructions must clearly identify their scope, including when an installer must choose suitable wall fasteners or seek help. Evaluate the complete assembled product, the intended contents and the actual installation arrangement. A generic anchor pack alone does not establish stability or compliance.
Keep hanging items away from the resting zone
Hooks should be positioned for the intended coat and lead lengths without allowing loose straps or heavy items to fall into the nook. The user needs enough clearance to sit without being pressed against hanging clothing. If an upper cupboard is included, verify that doors open without hitting the ceiling, adjacent wall or a person on the seat.
Inspect hooks, projecting fasteners, cabinet edges and the underside of the bench for sharp points or snagging hazards. Pet-facing surfaces must be finished and reachable for cleaning. Store leads deliberately; a hooked lead should not hang into the place where an animal is resting.
Specify finishes for wet and dry areas
Separate the material description into seat top, carcass panels, boot area, pet bay, edge banding, hooks, tray and textile cushion. An oak appearance can be achieved through different substrates and finishes, so request the exact construction and a physical finish sample. Pay special attention to cut edges and floor-facing surfaces exposed to wet shoes.
If regulated composite wood is used for products entering the United States, confirm the applicable TSCA Title VI panel, labeling and record requirements for the actual supply chain. EPA explains the responsibilities for finished goods and compliant panels. Do not treat a design rendering or a generic materials claim as compliance evidence.
Compare assembly and shipping before finalizing the design
A tall cabinet can be shipped fully assembled, partly assembled or flat-packed. Full assembly may reduce customer labor but creates a large carton. Flat packing lowers the height of the package but requires accurate alignment of uprights, bench supports, divider, upper cabinet and wall-fixing points. A partially assembled upper box can reduce alignment work while changing the carton layout.
Have a person unfamiliar with the furniture assemble a sample using only the supplied instructions. Record whether two people are needed, how the tall back is supported during assembly, whether left and right panels are distinguishable and how the wall fixing is completed. Install the cushion and tray only after the cabinet is secured according to the approved instructions.
Ask for carton count, external packed dimensions, gross weight and a packing drawing. Long panels and the seat’s exposed edges need protection; hardware must not rub against finished faces or the cushion. If the product ships in multiple cartons, define labels and what happens if one carton is missing. ISTA lists test procedures for different distribution environments, including furniture packages; select the appropriate procedure and acceptance criteria with the laboratory for the actual route and pack.
Review the sample in a real use sequence
- Mark the proposed room position, door swing, walking route and wall-fixing position.
- Assemble and secure the sample using the supplied hardware and instructions.
- Measure the pet opening and clear resting area with the cushion installed.
- Load coats and shoes as intended, keeping straps and wet items out of the nook.
- Pull the tray and cushion out independently, clean the exposed surfaces and reinstall both.
- Inspect seating support, hooks, edges, upper doors and pet-contact surfaces.
- Complete the agreed structural, stability and transit checks, then link the approved drawing, material list, instructions and carton to the same revision.
What to send with an RFQ
Provide a room sketch, maximum footprint and height, intended dog profile, required clear nook dimensions, seating use, storage capacity, preferred nook side, finish references, target market and order quantity. Specify whether hooks, tray, cushion and wall-fixing components are included. Request separate quotations for sample development, tooling, unit cost, replacement parts and packing; price and lead time require an agreed specification.
Explore our pet entryway furniture and the small-dog entry bench concept for a lower-profile option. Our design and development process supports customized layouts, materials, finishes and packaging. Send a brief to discuss your sample and quotation.
Frequently asked questions
Can the pet nook and boot tray swap sides?
They can be developed as left- and right-hand versions. Confirm mirrored drawings, fixing holes, instructions and carton contents; do not assume a finished design is customer-reversible.
Does a boot tray make the locker waterproof?
No. It helps collect ordinary moisture in its own area. The finished panels, seams, edges and cleaning method require separate review.
Is the pictured product ready for production?
The scenes illustrate concepts. Final structure, dimensions, performance, pricing and lead time require an approved specification and physical sample.